


Growing up, I don’t think my sister and I ever had store-bought costumes. My mom and grandma both are amazing sew-ers (seamstresses?), so they could find patterns of almost anything and create it in the pattern or fabric we wanted. I, however, can’t sew other than to maybe reattach a button. But I just can’t bring myself to buy costumes for my daughter, so I find other ways. I love the personal touches and creativity that go into homemade costumes. They may not always look as professional or as accurate as costumes that are mass produced, but no one else will have one like it! And now, thanks to the internet (which our parents and grandparents didn’t have the luxury of), you can find DIY tutorials and “no-sew” ways to create almost anything.
If you can sew, then you already know what you are capable of. But if you (like me) are capable of breaking a sewing machine while you try to load the thread tube and attach the needle into the holder-dohickey, you aren’t out-of-luck!
The simplest way to make just about any costume- Frequently referred to as “sandwich board costumes”, the easiest way to create just about anything is with poster board. You need 2 sheets, hot glue, scissors, and paints or markers. First, cut a 2-3″ strip from the edge of each poster board. Next, draw/paint the character or item on one piece and either replicate or do the backside of the image on the second one. Make sure the image is wide enough to at least cover the chest of the person who will be wearing it. Use a Google image search for inspiration if needed. Once your image is complete and dry, cut it out if needed. Then, use your hot glue gun to attach to the 2 strips you previously cut to the front poster board, shoulder-width apart. Determine the length needed by holding up both boards to the person’s body and then attach the strips to the back poster board as well. Now you have a simple “sandwich” costume!
This is an easy way to be just about anything. I remember using this method to be a totem pole when I was little. For something like that, you may need to cut a face hole out of the poster board and adjust where the straps are put. If you’re willing to spend just a little bit more and work a little bit harder, the same basic idea can be created with foam board. Foam board will hold up a little better (won’t tear or wrinkle as easily), but you will need to create your design/image/character from foam as well and hot glue the pieces together. I have had a hard time getting paint to look right on foam.
Think a little abstract- There is a tradition at the Disney parks called Dapper Day. I’ve never been but it looks like a lot of fun. From the pictures I’ve seen, people get super creative with the way they make their costumes. The idea is that you pick a character, then dress in a way INSPIRED by them as opposed to dressing LIKE them. It’s frequently referred to as Disney-bounding, but can be done with any character, Disney or no.
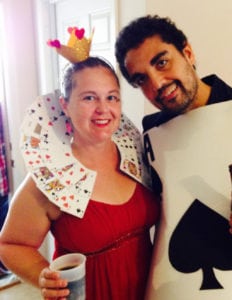
Confused? Here’s an example. For an event I have this Fall, we are supposed to Disney-bound. I chose Captain Hook for my inspiration (or rather, my almost-3-year-old chose Captain Hook for me). Captain Hook wears a long red coat with black boots and a feather in his cap. And of course, he has a silver hook on his left hand. So my outfit will be a red and black dress, black boots, a hat with a feather, and a silver bracelet formed to look like a hook. Another example was when I needed to dress like the Red Queen from Alice in Wonderland. I found a red dress that I already had. Then I took a deck of cards and hot-glued them to one another to form a collar. Gold craft foam was cut and put on a headband to make a crown. Eyeliner was used to draw a small heart on my cheek, and that was it.
Do you have additional equipment/resources?- I craft a lot (except sewing…). So I have a ridiculous amount of craft supplies that I’m pretty sure my husband hates. But this means that my not-quite-3-year-old has already figured out “Mama can make it!” Typically she’s right. I have tons of different paints, beading supplies, Sculpey clay, pipe cleaners, ribbon, and vinyl. Lots and lots of vinyl– specifically heat transfer vinyl. If you aren’t familiar with HTV, it is used to make iron on designs. I have a cutting machine which allows me to cut practically anything I can design on my computer. My heat press allows me to permanently adhere the cut vinyl to a variety of materials, like shirts. An iron would also work but doesn’t necessarily adhere the vinyl to the fabric as well.
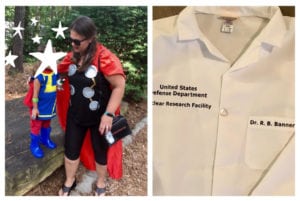
Since my daughter is obsessed with superheroes, we decided to go to ComicCon this year. And since I can’t just go to my first Con without a costume, we made costumes! My daughter chose Ms. Marvel for herself and then decided I should be Thor and Dad should be Hulk. Luckily, Ms. Marvel’s costume is simple – a blue tunic with yellow lightning bolt make up the most important aspect. I was able to cut the lightning from yellow vinyl and press it onto an oversized shirt. Rainboots, red pants, a scarf, and a mask finished off the look and were easy enough to find. For my costume, I found a simple image of Thor to use as inspiration. Silver disks and gold lines were cut from vinyl and added to a black tank top that then had a red cape safety pinned to the shoulders. The finishing touch was putting Thor’s hammer (also in vinyl) on a small clutch, making it more utilitarian than just carrying around a prop. Hulk’s costume was the easiest. We decided to go Bruce Banner mid-transformation, so all I had to do was personalize a lab coat and order a stuffed Hulk fist.
If you have access to vinyl cutters (like a Cricut or Silhouette) or know someone who has one and will let you use it, it opens up a lot of possibilities.
I don’t begrudge people who buy costumes for their kids, but it’s just not for me. In her first 3 years, my daughter has been: Yoda (made from a crocheted hat and a swaddle); a Scuba-diver (black top and pants, cardboard mask attached to a headband, pacifier attached with ribbon to a coke bottle painted yellow); and a Flying Monkey from Wizard of Oz (my mom sewed this one!). This year, T has gone back and forth between wanting to be the Grinch, a skeleton, and an avocado (sigh). My creativity is certainly being tested, but I enjoy the challenge and know that one day she will look at pictures of her home-made costumes (no matter how ridiculous they turned out), and smile.


