


If your kids are like mine, they constantly want to “help” you cook. October 1st is National Homemade Cookie Day, making it the perfect opportunity to invite them into the kitchen with you!
Use a Cookie Press 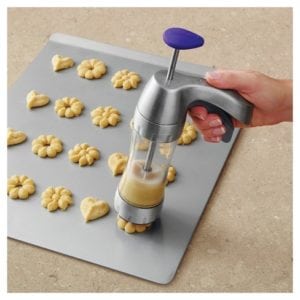
Cookie presses are ingenious! They make baking sugar or peanut butter cookies super simple, although it’s sad they don’t work as well with chocolate chips. If you aren’t familiar with a cookie press, it basically consists of a tube that holds your dough, interchangeable plates that allow you to create different shaped cookies, and a trigger that you squeeze to push the cookie dough through the plate onto your cookie sheet. The cookies come out a uniform size because each squeeze only pushes out a certain amount of dough. The plates change out easily so each kid can make their own shape if desired.
Make Monster Cookies 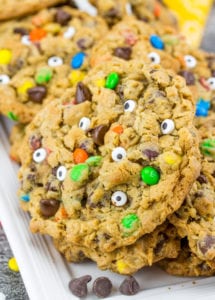
Monster cookies are the best because they can have every ingredient imaginable in them. They’re also great to make with kids because you can separate out the base batter and allow each kid to mix in their own favorite things. Start with your favorite cookie base (you know– eggs, sugar, flour, butter…). From there you literally just mix in whatever you want– M&Ms, chocolate chips, peanuts, oats, pretzel pieces, raisins…and since it’s October, why not make them a little spooky? Get some of those sugar cookie eyeball decorations and mix them in as well! Make them even better by making them huge! (Monsters are big, right?)
If you don’t have your own recipe to start with, here’s a good one to try: Monster Cookies
Bust out the cookie cutters
Surely I’m not the only mom around with more cookie cutters than I can count…make an easy no-chill sugar cookie dough, then let the kiddos help roll them out and choose their favorite shapes to cut them out. Decorate your cookies with simple royal frosting. A few tips…
- Use parchment paper– not only on the cookie sheet but also to help with rolling out the dough. I’ve found it works best to lightly flour a sheet of parchment paper, plop the dough in the middle, lightly flour the top of the dough, and cover with another sheet of parchment. Use your rolling pin on top of the second sheet. This keeps the dough from sticking to the rolling pin.
- Don’t misshape your cookies by moving them around too much. Instead of cutting the cookies out and then transferring them from the counter to your baking sheet, make sure the parchment in the above tip will fit on your baking sheet. Then, when you press out the cookie with the cutter, leave it on the parchment. After you have cut all the cookies you can fit, peel the leftover dough out from around the cookies rather than the reverse.
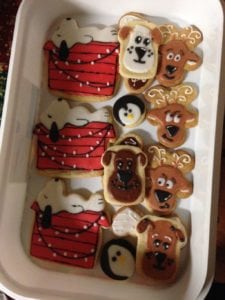 Don’t limit yourself to the cutters you have available! Or rather, look at the shapes in different ways. That boring gingerbread man cookie that everyone has? It can easily be any person, like an astronaut or Spider-man. But turn it upside-down, and you can create a super cute reindeer. A snowflake can become a spider web. Turn Santa’s head up-side-down to make a ghost. Need a cookie shape that is really outside the box? Overlap cutters to create new shapes. I created Snoopy on his doghouse by overlapping a gingerbread man on top of a haunted house, removing the arm and replacing it on the head to make Snoopy’s nose.
 - Make a super simple royal frosting. All you need is milk, powdered sugar, and liquid food coloring. I haven’t found a good ratio to use, but the general rule is that if you can drag a toothpick through it and the line you draw doesn’t fill in for 2-3 seconds, it’s thick enough to use for decorating. If you add food coloring, be sure to re-test the thickness. Continue to add milk or powdered sugar as needed to make the frosting thinner or thicker.
Make coloring book cookies
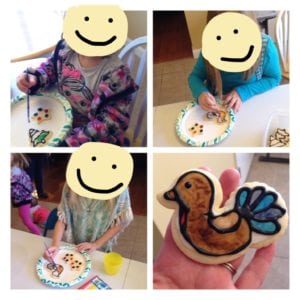
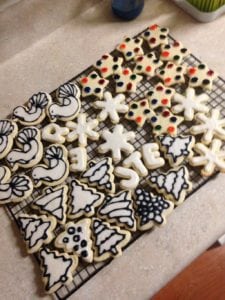 Since October 1st is a school day this year, it might be difficult to find the time to actually bake the cookies with your kids. But that doesn’t mean you can’t still involve them in a super fun way. Coloring book cookies are an awesome way to make custom cookies that your kids can decorate on their own! Bake simple sugar cookies and frost half of them with a thin layer of white royal frosting. On the other half, pipe on several gobs of frosting that don’t overlap. Once that is completely hard (speed up drying time by placing the cookies in front of a fan), either use edible markers or thick black-dyed royal frosting to draw outlines on the first cookies. The drawings can be simple, like hearts, flowers, smiley faces; or intricate, like cartoon characters or holiday images. On the cookies with frosting globs, put a drop of food coloring in desired colors on top of each gob. Once these are all dry, your kids can use a clean (preferably new) paintbrush to dip into water and treat the now-colored gobs like watercolor paint on the decorated cookies.
 When all else fails…
Use store-bought cookie dough from a tub or a roll of slice and bake. As long as you make them at home, they’re still “Homemade,” right?


Absolutely love the coloring book cookies idea! So fun and perfect for little hands who want to “help” <3